46. Pi-Desktop
This project now features another programmable board, besides the Arduino, and that is the Raspberry Pi. This is basically a credit-sized computer, with GPIO pins as a way to control components, such as a servo, LEDs, and so on. There are many projects for this computer board, but one of the common uses for it is basically making it as a PC.
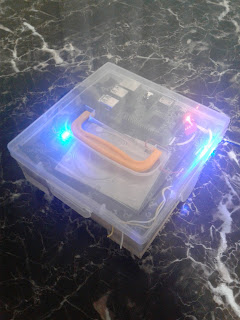
In the pictures shown at the top and below, this is the setup for making the Pi as a computer for portable functions, just like a regular desktop computer.
The board that I'll be using is version 3, model B since it has all the updated features that stand out from the previous models. For example, this version has a 4× ARM Cortex-A53, 1.2GHz for the CPU, and the Broadcom Video Core IV as the GPU. It has 1 GB of ram for memory, utilizes micro sd cards as Read-only memory, and even has Bluetooth and wireless Internet capabilities. All of these features make it perfect for making your very own PC, all at a cost of under $40.
 |
| <Parts for this project> |
To get started, you would need to get the items-usually the ones you would get when you are setting up a computer. In this case, you will need a mouse, and a keyboard, to control the OS once it's installed. you will also need a micro SD card for the Raspberry Pi since this is where all the data/OS is stored in. At least 8 GB of memory is sufficient for installing the OS. Optionally, you can get a USB external hard drive, to store the rest of your other data in, case there is not enough room in the SD card.
Finally, you will also need a power source. Since this project is going to be portable, you will need to get the Li-ion batteries, alongside a charging board.
 |
| <Test> |
Once you got the parts, it's time for assembly. Firstly, you need to get the Li-ion batteries (At least 6 in parallel, and then solder them. Then you will need to solder 2 wires, indicating a (-), and (+), and solder them to the corresponding points from the charging board. Bring out the sd card, connect it to your computer, and make sure that the card is formatted, once it was done, download the NOOB software from the Raspberry Pi website. Make sure that once it was done downloading, you now have to extract all of the files to the SD card. Once you got it, eject the SD card from your PC, and insert it into the slot from the Raspberry Pi.
 |
| <Setup> |
Now, you will have to get your peripherals out, which is your keyboard and mouse, and connect them to the Raspberry Pi through its USB slots. Hook up the HDMI cable to the TV, and to the PI by the other end. Make sure that the TV is turned on, and as so, get the mobile phone cord, plug it into the charging board by USB first, and then into the Pi, if it's all set up correctly, the Pi should flash red and green, and the TV will emit a display of the OS installation. Follow the instructions for the installation, and wait for it to write the data to the SD card. Once it's done, it should reboot, and you got your very own Raspberry Pi PC.
You could go one step ahead, such as adding the already mentioned USB hard drive, for data storage, and even try a plastic enclosure, to protect the electronics, as well as save space.
<Attempt at making a laptop>


Comments