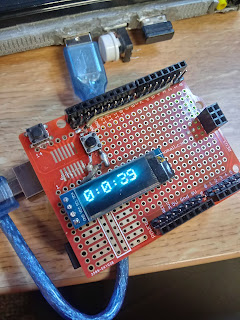
60. Crude arduino stopwatch
I will be demonstrating how to create a stopwatch with a play/pause function out of an Arduino, an OLED, a switch, a resistor, and a protoboard. The way this stopwatch worked is that the Arduino interfaces with the OLED screen through I^2C. Standing for Inter-Integrated Circuit, the Arduino controls the OLED by sending in the data with different bitrates to the screen, and the Arduino clock connection makes sure that the data sent were synchronous with the timing.
The code itself works by displaying 3 numbers, going from hours to seconds on the OLED. The "seconds" is the one driving the stopwatch, where for example when the moment the seconds reach 60, it resets back to zero, and the "minutes" was incremented once. 1 hour = 60 minutes, and 1 minute = 60 seconds.
 |
| <Test> |
To start with the build, you will need a protoboard to assemble your OLED display, which is done by soldering the headers on the OLED, soldering it to the board, and connecting it to the Arduino with the connections Vcc, Ground, SDC, and SDA.
Once you got the OLED installed, make sure to have the code used to run the screen with random messages. Since the Arduino controls the OLED directly, it's best to have the library from Adafruit so that the Arduino drives the screen with the set parameters from the code.
 |
| <Test 2> |
As you got the display to work, it's time to make it a stopwatch. You will need to assemble a trigger switch to pause/play the time, which is done by connecting one side button switch to the ground, and the other side to the resistor, which connects to Vcc. Connect a wire between the switch and resistor to the data pin 2 of the Arduino, and you're done.
The code for the stopwatch was simple-you just needed to add the parameters from the code so that the display can be driven much easier. You must initialize with the variables: h n s, representing the time for the display, as well as the variables: button state and button pin.
The last two variables will be used to make the code play or pause once you push the button.
 |
| <Implanting the button> |
There are multiple "if" statements in the code, which are used for incrementing "s" for 1 second, and then incrementing "m" for 60 seconds, and finally incrementing "h" for 60 seconds. With the button utilized, I used the HIGH and LOW as the states for the code. The state on the stopwatch was set to LOW by default, so it can't start, but once a button was pressed, the state was set to HIGH, and so it starts!


Comments