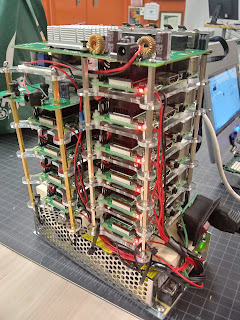
70. Pi cluster/supercomputer
(It will require a great amount of skill for computer programming, and having to wire up multiple Raspberry Pis together.) This project was about utilizing multiple micro-computers and combining their power to form a supercomputer. In a more specific way, when these computers are connected together, each of them will process their own data, but later combine their data as if they are communicating/working together, and so they will process more data than with just one micro-computer.
 |
| <Supercomputer> |
With this kind of computer processing, you can put the supercomputer in applications like parallel computing,(as mentioned above), or you can make it as a server, since this supercomputer is basically a cluster of micro-computers, or even cryptocurrency mining, since each computer will mine the data, and combine it all together.
 |
| <Parts> |
To get started with the build, you will need several pis, a 5-volt power supply that can provide more amps, an ethernet switch box, some cables for the ethernet, thick wires, boost converters, and housing.
You will need to solder the red and black wires to each of the pis so that it will be easier to connect them in parallel. Don't daisy chain the pis, just connect them parallel directly to the power supply.
You will need housing to house the pis in an organized fashion. It can be done by adding a base to each pi and adding mounting rods to house each base so that it becomes a stack of PIs. For power, know the polarity as well as connect the boost converters(set to 12 volts) to the switch boxes so that they also receive power.
 |
| <Cluster> |
For the tedious step, you must format the sd cards available for the number of pis, and burn each Raspian image to the cards. There, insert the sd cards into each of the Raspberry Pis, and turn on the power supply to see if the pis are booted up with the green LEDs.
Not only that, once you already connected the ethernet cables from the port of the pis to the switch box, there should be activity on the LEDs indicating that the data are being transferred. At this moment, you will need to access the pi by either connecting it by HDMI or using VNC/SSH with the Pi's IP address. You will need to know which pi will be set as the master since the master pi's function was to control the rest of the "slave" pis together to perform that kind of parallel processing.
 |
| <Connections> |
At this point, you will need to know how to make the pis communicate with one another, but also need to make sure that the pis have access to the other pis. Without doing the encryption changes, the pis won't be able to communicate with others, as it will error out as permission denied.
Even then, once you are able to have the pis accessing each other, you are ready to start out in the world of pi supercomputing!


Comments