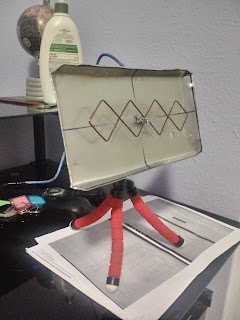
78. Biquad Wifi antenna
This simple modification will allow your wifi module to pick up more wifi signals by up to 10 Dbi-exceeding to that of a stock antenna. This antenna design is called the Bi-quad antenna, which is a directional type antenna that is mostly popularized by several. The reason why it's made popular is due to the materials needed (From some hardware stores or even at home) and it can be assembled with little to no difficulty.
The way it works is that in a Bi-quad antenna, there are 2 parts: the element and the reflector. The element is the part where it collects those 2.4GHz signals from a wifi source and transfers the signals to the wifi module itself. The element is specifically tuned to collect these 2.4 GHz signals. In other words, each side length of the square equals 1/4 of the wavelength. The reflector allows the wifi signals to be reflected back and into the element, allowing the element to capture more, and thus increasing the Dbi output. It can be a metal plate of some sort, and it has to connect to the ground as it is a part of the antenna.
 |
| <Bi-quad antenna w/o reflector> |
Because of the way the antenna is designed with the reflector, it's considered to be a directional type. This means that the antenna will collect the wi-fi signals if it's pointing at the source. As mentioned, the added benefit of such a directional antenna is the fact that the reflector will capture any wifi signals, and bring them to the element, which means more distance range. However, because the beam width is (theoretically) 70 degrees on the element, it made it much easier to aim the antenna (element side front) to the source without doing more tweaking.
In comparison to the other antennas (like the cantenna to a conifer antenna), The Bi-quad antennas have a very wide beam width, which as mentioned, makes it much easy to aim the antenna at the wifi source. In fact, you can aim indirectly at the source, and you still get the antenna to collect the wifi signals, and get the internet.
I will also mention that the antenna itself can be small enough to be portable (In comparison to the other antennas), giving it a form factor.
 |
| <Test 1> |
To assemble this antenna, you will need a coax cable, a tin container, a metal plate of your choice (110mm by 220mm), a tripod, thick copper wire, and a USB wifi transmitter with a full (or similar connection).
You will need to disassemble the wifi module to get to the Uhl connector and solder the output of the wifi to the coax wire core, and the ground to the coax shielding. Everything must be housed in the tin container as shown in the pics.
To install the reflector, simply drill the hole to the center of the plate, strip off the coax cable to expose the shield and the frayed wires, pull the frayed wires back to the coax cable, and push the plate in for a snug fit.
 |
| <Test 2> |
To assemble the element, You will need to bend the copper wire as if it has 4 squares. Each side represents 1/4 of the wavelength, so bend the wire when it's 30.5mm to 32mm at 90 degrees. Make sure you bend the other way when you see the square forming, and don't stop until you have 4 squares at the end.
Once you construct the element, solder the coax wire core to the top middle part of the element, and the 2 ends of the element to the coax shield(ground). Once you have it installed on a tripod and wired up, you are ready to collect more wifi.
(I used the software Wavemon on ubuntu, try blocking the antenna with some DVD/CD disks to see how the strength fluctuates.)
 |
| <Internal Ant. vs modified Ant.> |


Comments