62. Arduino Stopwatch/pedometer
This stopwatch project is based on the previous one (Project 61), but it's now more compact and has more features. Being that it was compact, it means that you can fit it in your pocket, and so it will make it easier to use on applications such as tracking time, and so on. The code was still based on the original stopwatch code, where if the state of the button gets high, the variable "s" gets incremented every second, and so on.
 |
| <Stopwatch> |
However, 2 more features were added to the code, which are the pedometer, and a crude timer. With those 2 features, it makes the small device handier than it already was. Instead of using an Arduino Uno, it uses an Arduino-type board called the Arduino Nano. As the name applies, it was a very small Arduino useful for portable projects.
 |
| <Arduino nano> |
To get started with the build, You will obviously need an Arduino nano, 2 pushbuttons, a tilt switch, an OLED, a perf board, a li-poly battery, a tp4056 charger, and a 5-volt voltage booster.
You will need to solder the OLED and the pushbuttons into the perf board first just so it will make the wiring process a little easier. Once you got it, wire up the OLED to the Arduino, with Vcc and ground respectively, SCK to A5, and SDA to A4. Wire up the pushbuttons and the tilt switch to the first digital pins of the Arduino, such as D2.
The tilt switch will act as a sensor where when it detects movement, the ball inside the switch will move, hitting the 2 contacts, letting the data current flow. It's important to position it to ensure that it's effective.
 |
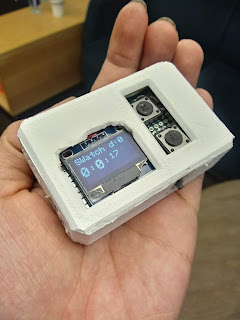
| <Screen> |
For the sake of using resistors as a way to make the switches HIGH, in the code, use INPUT_PULLUP for each of the switches. That way, you won't need the external resistors and take up space. The battery itself has to be flat as possible so that it will make it easy for the user to fit the device right in the pocket. The casing itself was 3d printed, but you can use any kind of case you watched as long the device fits.
To work with the code, we are going to use the stopwatch code from project 61, but with 3 switches, you will need to make multiple if statements, so that when you push a certain button the if statements will make the state HIGH or LOW. Depending on the state, it will make the programs play or pause, and can even switch to a different feature when a particular button is pressed.
 |
| <Internals> |
The pedometer part of the code was just the counter with the tilt sensor as a sensor. As you shake it after pressing the button, the step counter will increment, and so you will see how many sep you took.
The Timper part has the same principle as the pedometer, but you will need to hold down the button so that the seconds were incremented manually. Once you press that button, it will start, and once it reaches the end, it will give you a sound notification.
That are many possibilities when it comes to using an Arduino Nano, and this is just the start!


Comments