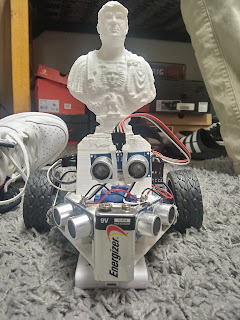
64. Arduino object following robot
For this post, we will modify the last project called the Arduino obstacle-avoiding robot, and convert it so that it does the opposite. All we need to have is the previous build of that robot, 2 more ultrasonic sensors, and a new code.
The way the robot works after the modification is that the sensors detect the distance between the object and the sensor itself. Once the sensor detects the object at a specific distance, then the sensor will send in the data to the Arduino, which drives the motors to get a turn and get close to the object.
Since it works with 3 sensors, it means that the front sensor will detect the object that is in front of it. Once the side sensors detect an object, they will turn so that it will be oriented with the front sensor altogether.
 |
| <Sensors> |
There isn't that much to change once we have the robot from the previous post, but you need to wire up the 2 other ultrasonic sensors to the analog inputs. Since the Arduino has 6 analog inputs (A0, A1, A2, A3, A4, A5), rewire the first sensor to the first analog inputs to make room for the other 2 sensors. Ultrasonic sensors have a trigger pin and an echo pin, so try to remember to wire them up properly.
What these sensors share in terms of connections is the Vcc and ground connections, so try to connect them in parallel to each other. At this point, all the analog inputs from the Arduino have been used up.
 |
| <Side view> |
Once you got the sensors all wired up to the Arduino, you will need to position the sensors on the robot chassis. The front sensor stays in the same position, but the side sensors have to be mounted on the sides. Note about the robot chassis, since positioning the sensors can get tricky. However, once you know where to put the sensors in on the sides, mount them with strong silicone glue.
Makes sure that the connections didn't break as you are mounting the sensors onto the robot chassis, otherwise, it can be tedious to wire the pins of the sensors back to the right connections.
 |
| <Placement> |
To get started, bring up the same code used for the obstacle-avoiding robot, and try to initialize the sensors. We're initializing it in the code since the original code didn't have 2 other sensors in. Once you successfully initialize the sensors. Modify the code so that instead of avoiding the object, it goes for the object. for example:
if(distance <= 40 && distance1 >= 20){
move forward();
}
means that once the object is detected from 40 to 20 centimeters, the robot will move forward to that object.


Comments