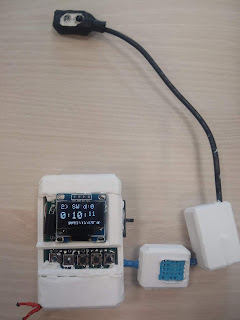
66. Crude Arduino Fitbit (Fitbit V1)
In this project, we will be improving the Fitbit from the last project to add new functions to it. It will have the original functions, which are Stepometer, timer, and stopwatch, but we're adding 3 new functions. The 3 new functions for this crude Fitbit are the accelerometer display, heart rate detector, and a humidity/temperature function. With these functions, we should be able to make this device multi-purpose rather than keep it limited.
To get started, you will need a group of parts for each function for the crude Fitbit. The heartbeat sensor requires an LM386 chip, IR emitter and detector, resistors, and capacitor. The humidity and temperature function requires a dht11 sensor and a 10k ohm resistor. And finally, You will need an MPU-6050 for the accelerometer reading.
 |
| <Screen and Nano> |
Once you got the parts, you will need to assemble the group of parts together for the function the crude Fitbit is going to have. With the heart rate sensor utilizing the receiver and emitter part, it's best to have 2 separate circuits, where one does the IR emitting, and the other detects the IR beam. The receiving part of the sensor will utilize the LM386 to boost the signal, and so makes the data clear.
The temperature function will use the sensor called the DHT11, which is the sensor that can detect not only the temperature but also the humidity. The final function will use an MPU-6050 accelerometer module, which this module is cheap and easy to connect to the Arduino nano since it uses the I^2C interface.
 |
| <Heartbeat sensor> |
Before we can combine the functions together, you will need to add the additional push buttons to change functions while in use. In the code, add more states and button pins so that when a button is pressed, it initializes a variable responsible to choose. Once the variable is initialized, it will immediately set the display to that function, such as heartbeat detection.
When it comes to making the code for each function, you will need to have a library for each sensor, mostly for the DHT11 sensor, and the MPU-6050 sensor. The heartbeat sensor will only use the filter library for filtering out the raw data, into data that the Arduino can use, and display the information on the OLED.
The accelerometer function reads out the data when the device is positioned on the X Y and Z axis.
The temperature/humidity function detects the temperature from Fahrenheit to Celsius and detects the humidity by percentage.
 |
| <Module assembly> |
At this moment, once the modules are assembled, they will be wired by power and data connections. Once the modules and the pushbuttons are properly connected, and the code has been uploaded, double-check to make sure the device works out as planned. Once successful, you will need to make an enclosure to hold the circuitry in, and you are done!


Comments