82. RC Quadcopter
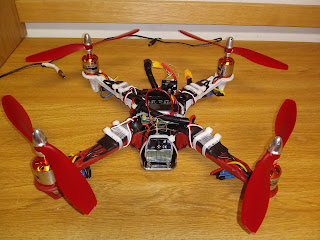
This project may seem difficult at first, but when you start to learn how to build and control it, you will gain experience with it. A quadcopter(drone) is a type of multirotor utilizing 4 motors to make the copter fly. There are other variants of the multirotor, such as a hexacopter, tricopter, and so on.
 |
| <Quadcopter> |
As it flies, the accelerometer/gyroscope is needed to stabilize the drone, which causes one or more of the motor's speeds to increase or decrease until the drone remains level. To drive the motors, the electronic speed controller is needed as it can output a 3-phase voltage. The microcontroller acts as a core to drive the ESCs while using the signals from the receiver. the accel/gyro sensor should be implanted in the microcontroller.
 |
| <Parts> |
To start building this drone, you will need a frame to house the components together, with 4 brushless motors paired with appropriate ESCs. For my configuration, I went for an f330 frame, with 1120 kV motors paired up with 30 amp ESCs. Make sure that the ESCs are suited enough to drive the motors, or else the motors can be underpowered/overpowered. The propeller size is important, depending on the frame, so for mine, I used the 8045 (8 inches) type propeller.
 |
| <Assembly 1> |
Install the motors to the assembled frame, making sure that the wires are stretched out for easy connections. Wire up the motors to the ESCs (Make sure that the motors go Counterclockwise and clockwise depending on the layout), and connect with the servo connectors to the microcontroller (Again, making sure they are connected to the right ports according to the layout.). If the frame has an included distribution board, use it to wire up the ESC's power lines so that they will receive power. To get the power, have a lipo battery (like the 11.1 v 3000 mah), and wire up the battery to the distribution board(or use the xt60 connections to make swapping easier).
You will need a microcontroller for this, so for mine, I used the KK2.1.5, which has the convenience of setting up the drone using the included screen. Set the transmitter and receiver (making sure the receiver is at least 6 channels) and wire up the output channels to the input ports of the microcontrollers. With the kk2.1.5, you can see if you wired up the ports correctly by going to the transmitter stick option so that you can change the ports, reverse them, and so on.
 |
| <Assembly 2> |
Make sure that the wiring is complete, but before you start to fly the drone, try to calibrate your microcontroller in terms of accel/gyro. This will let the microcontroller know how it needs to be leveled as it flies. You should also try to practice how to fly the drone so that you will sustain little to no crashes. If once again you are using the kk2.1.5 board, there is an option of using the self-leveling, which will make flying more easier.
Once you got the hang of it, you are ready to fly it with ease, just also make sure it's registered before you fly, or you can fly it indoors (if the drone is small/the room is big).


Comments